
List of Features on the Sms Platform: User Guide
Compose: How to compose a message
To compose a message, log in and click on the Compose tab on the left-hand side. Fill in your sender id ( max of 11 characters) in the space provided for it.
Select how you want to input the recipients’ numbers on the platform. There are three ways to do this.
Type or Paste numbers: This allows you to either type in recipients’ numbers manually or to copy numbers and paste them in the big box provided for them below. They can either be arranged horizontally separated by commas or vertically i.e one number right on top of the other.


Upload Recipients’ list: You can input the numbers by uploading them from a Notepad or an Excel file. Please note that the numbers in excel must be formatted as string or text so that there will be no issues with the numbers used.


Click the Browse button and select the file that you want to use from your device.
Send through Phonebook: You could send messages to recipients by using a phonebook on the platform. A phonebook is an electronic storage of phone numbers of recipients that you can save on the platform.
When you want to send messages, select send to Phonebook to send to recipients’ numbers saved on an existing phonebook.

If you do not have one, then click on Create one here to do that.
Next is the Message. Type your desired message in the box provided. A page of a message contains 160 characters maximum.

When sending messages, you have four options.
Send message: You can use this option when you want to send instantly with units you have already purchased.
Use Free Sms: You should use free SMS when you want to test the delivery of the SMS platform. Please note that all Free Sms contain adverts.
Save Draft: This can be used when you want to send a message but would like to send it much later. You can do this by typing the message and saving the message to send later.
Send Later: This is similar to the Save Draft option except that you can schedule a time in the distant future and the messages will be sent at that specified time without human intervention.
You can even schedule the message to be sent in 3 months. Just click the Send Later button and the button changes to Add More Date. Change the time in the Schedule Date box by editing the time directly or by selecting the calendar on the right hand of the schedule box.

Message History: When you log in, click the Message History Tab on the dashboard. You will see a drop-down menu of 3 options namely: Sent messages, Dnd messages, Refunded messages which will be explained in detail later.
Message history gives you information on all the messages you sent on the platform.
-
Sent Messages: This shows a breakdown of your recent sent messages on the platform. It shows the sender id, message, number of recipients (s), channel, date sent, status, Batch Id and Action.

Under Action, you can view the delivery report by clicking the View Delivery button, click on instant resend to resend a message at that time or edit and resend a message instead of starting the message from scratch by clicking the edit and resend button.
To access much older messages, you can click on the Archived messages at the top. To download in Excel, click on the tab to the left-hand corner of the page.
-
Dnd Messages: This shows a breakdown of messages you sent to but are on dnd. It shows the sender id(s), message(s) and the dnd routed numbers.
-
Refunded Messages: This shows a breakdown of messages you sent but were refunded for. These are dnd numbers that you have been refunded for. It shows the sender id(s), message(s) and refunded numbers.
Phonebook: You can create a new phonebook and or manage an existing phonebook by clicking the Phonebook tab after login.
To create a new Phonebook, click the Phonebook Tab.

While on the page displayed, click on Add New Group on the left-hand side of the page. Type in your desired group name and enter the phone numbers in the boxes provided accordingly.

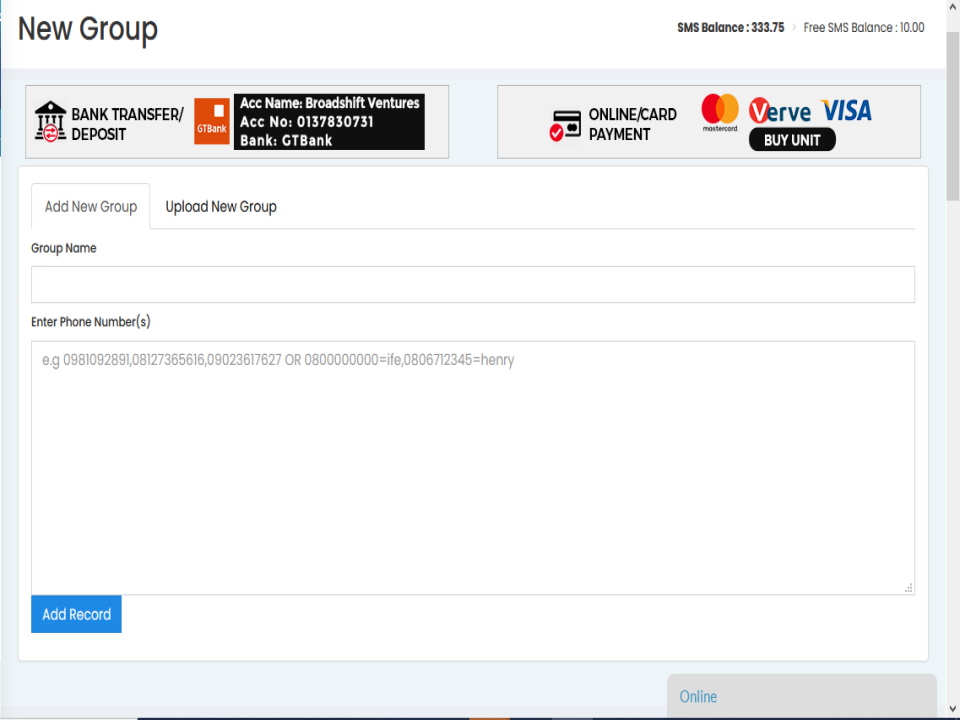
The option to add a new group manually or upload recipients through a file exists. Select Upload recipients using a Notepad or an Excel file to create a phonebook using files on your device.

You can also manage the contacts on the phonebook created. To do that, click on Manage.
Drafts: You can access all your saved messages by clicking the Draft tab after logging in.
Voucher: During a promotion or a giveaway, you can use any voucher you receive by clicking on the Voucher Tab. Enter the code and click on the Proceed button to make use of it.

Transaction History: This page provides info on all the financial transactions that occurred in a customer’s account. It gives details about the following.
Transaction Id: This is a unique id that is specific to a particular financial transaction of the customer. It is usually a very long number.
Created date: This is the date a particular financial transaction occurred.
User name: User name is the name of the customer/client using the SMS account.
Old Balance: This refers to the previous balance before a financial transaction.
Amount: This refers to the amount of naira in a financial transaction.
New Balance: This refers to the new balance after a financial transaction.
Sms Units: This refers to the units equivalent to the amount of naira in a financial transaction.
Action: You can click on the button to view the breakdown of the transaction.

Buy Units: The Buy units is a very useful tool. It can be used to calculate the number of units and the corresponding value in naira. To use it, log in and click on the Buy Units Tab.
On the Buy Units page, input the number of units you would like to purchase and the corresponding value in naira will appear below the box.

Profile: This is a page where a user can access and edit his details used in the creation of his account. After editing, click submit to update changes.
New Payment Notify: Click on this tab to create and send notifications on manual payments to the accountant
Change Password: Click on this tab to change an existing password. Fill in the old password, then filling in the new password, then re-fill the new password as confirmation and click submit to save changes.

Log Out: Simply click on this button to log out of the SMS platform.
Register Sender Id: You can register your sender id by clicking on the Tab. Type in your sender id (11characters max) and select the sender id type.

Marketing: This is used for promotion as a way to create awareness for a business or programme e.t.c. Small business owners tend to go for this option.
Corporate: This is used by businesses that are corporate, well structured and generally much bigger than SMEs.
Transactional: This is used by clients who use SMS as a means to send records or messages of financial transactions to clients regularly.
Select the appropriate sender id and click submit. The sender id has been submitted for registration.
Sim Host Dashboard:
API: Click on this tab to be taken to the API page. This page gives information and documentation for API users to use to have easy integration for their website(s).
Pricing: Click on this tab to be taken to the Pricing page. This page gives information on the bank account details for payment, details users should send after a successful payment, pricing of SMS units when buying and sending SMS for end-users and resellers.
Payment: Click on this tab to be taken to the Pricing page. This page gives information about bank account details for payment and the types of payments options available.
Resellers: Click on this tab to be taken to the Resellers page. This page gives information about the total amount of money needed to build a fully functional reseller website. This includes prices for website development, domain name and hosting.
It also includes the details to be sent to us via mail to customise your website.
FAQs: Click on this tab to be taken to the FAQs page. FAQs are known as Frequently asked questions that users always ask. This is useful to all users because you can easily access it for answers to already answered questions.
Sender Id Registration: Click on this tab to be taken to the Sender Id registration page. It explains what a sender id is, the importance of registering it, how to ensure that it is registered successfully and the timeline for registration.
DND: Click on this tab to be taken to the DND page. This page explains what DND is about, the types of DND, how to activate or deactivate DND on a phone line.
Delivery report: A breakdown of the data on SMS sent on the platform from the customer's end. To access the delivery report, click on the Message history, Sent Messages, then View Delivery Report.


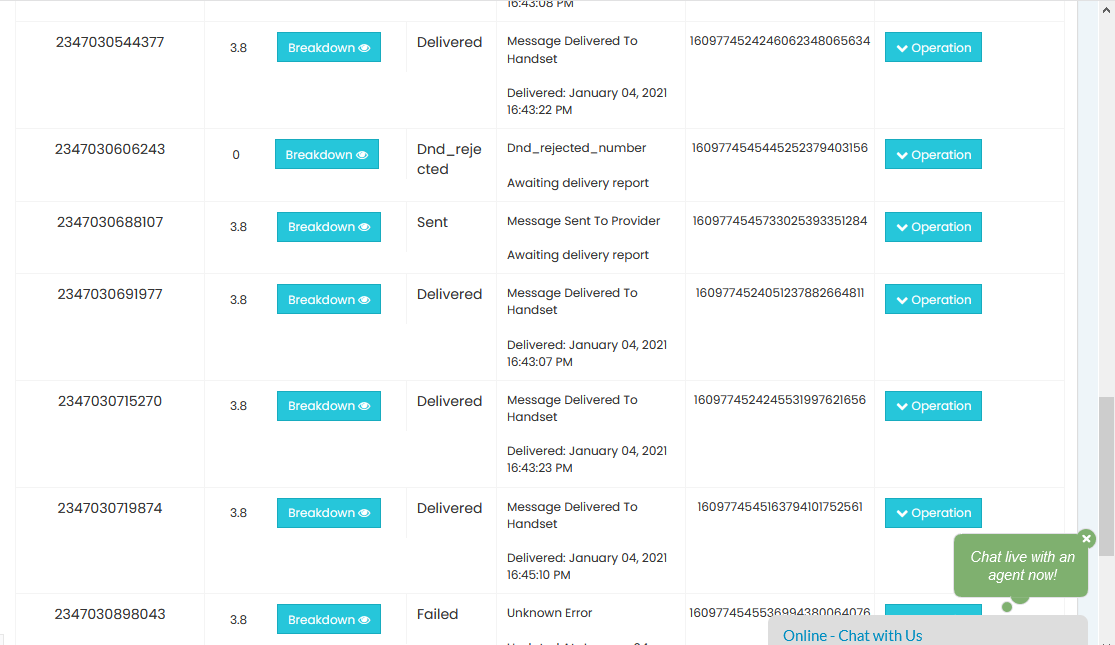
The sender id, message content, user name, sent date, number of pages and recipients, total units used, channel, status and batch id are provided.
It also shows a detailed table of recipients' numbers, the amount charged per number, status, status reason, message ID and action.
This gives users access to message analytics and helps them to better monitor their messages.
Message Scheduling: This is scheduling a message to be sent at a later date without human intervention. See Send Later under Compose for more info on how to schedule messages.